Zenject InterfaceのBindにおけるIdの付け方
BindするInterfaceにIdをつける場合WithIdの書き方が限定される。 BindInterfacesAndSelfTo等を利用してまとめての指定はできなそう。
public class SceneInstaller : MonoInstaller<SceneInstaller>
{
    public override void InstallBindings()
    {
        // できない
        Container.BindInterfacesTo<Sample>()
            .WithId(1)
            .AsCached();

        // できない
        Container.BindInterfacesAndSelfTo<Sample>()
            .WithId(1)
            .AsCached();

        // できる
        Container.Bind<ISample>()
            .WithId(1)
            .To<Sample>()
            .AsCached();
    }
}
Zenjectとかが絡むコンポーネントのUnit Test
Zenjectが絡んだときのUnit Testの例を紹介します。 あくまで例です。
例えば以下のようなHomeUseCaseというクラスのテストを行う場合を考えます。
using System.Collections;
using System.Collections.Generic;
using UnityEngine;
using UniRx;
using Zenject;
using System;

public interface IHomeUseCase : IUseCase
{
    IObservable<IHomeViewModel> LoadHomeModel();
}

public class HomeUseCase : IHomeUseCase
{
    [Inject] IUserRepository userRepository;

    public IObservable<IHomeViewModel> LoadHomeModel()
    {
        return userRepository.Get()
            .Select(entity => new HomeViewModel(entity));
    }
}
HomeUserCaseはLoadHomeModel()をコールすると、 いろいろやってIHomeViewModelというインターフェースを取得するためのObservableを返却します。
また、HomeUseCaseはIUserRepositoryに依存しており、Injectアトリビュートで依存注入されています。
ちなみにUserRepositoryは以下のようなIOを担当するようなコンポーネントで、 通常はサーバー通信を行うコンポーネントとのインターフェースになります。
using System.Collections;
using System.Collections.Generic;
using UnityEngine;
using UniRx;
using Zenject;
using System;

public interface IUserRepository : IRepository
{
    IObservable<UserEntity> Get();
}

public class UserRepository : IUserRepository
{
    [Inject] IUserDataStore dataStore;

    public IObservable<UserEntity> Get()
    {
        return dataStore.Get();
    }
}
この時点でHomeUseCaseをテストするためには以下の要点をどうにかする必要があります。
- TestコードでInjectアトリビュートやContainerをどう扱うか
- UserRepositoryをそのまま使うとサーバーへ通信してしまうし、そもそもHomeUseCaseのテストにフォーカスしたい
- UniRx使っていて非同期ぽいのをどうテストするか
解決方針
こんな状態のコードをテストをするために以下の2つの方針をたてます。
ZenjectUnitTestFixtureを使う
「1.」についてはZenjectのOptionalExtras以下にあるZenjectUnitTestFixtureを継承したクラスでテストを行うことで解決できます。 ZenjectUnitTestFixture継承したクラスでは、デフォルトでContainerを扱うことができ、 そこにテストに必要なコンポーネントをバインドしていくことでInjectアトリビュート等を扱ったテストが可能になります。
Mockフレームワークを使う
「2. 3.」に関してはMockを利用します。 Mockは本物のオブジェクトの代わりにテスト用のオブジェクトに差し替える仕組みです。 これにより、依存するオブジェクトをすべて用意する必要がなくなり、 テストしたいものだけにフォーカスできます。 また、依存するオブジェクトの状態も自由に用意できます。
ZenejctにはOptionalExtras以下にMockフレームワークのMoqが付属しているのでzipファイルを解答することで利用可能になります。
OptionalExtras以下にあるAutoMockingをダブルクリック後に展開されるファイルの中に Moq-Net35、Moq-Net46があるので、Unity Editorの状態に合わせて再度ダブルクリックします。 するとMoqディレクトリが展開されます。

実際のテストコード
このあたりを含め以下のようなテストコードを実装してみました。
using UnityEngine;
using UnityEngine.TestTools;
using NUnit.Framework;
using System.Collections;
using Zenject;
using UniRx;
using Moq;

public class HomeUseCaseTest : ZenjectUnitTestFixture // ①
{
    [Inject] HomeUseCase useCase; // ⑥
    [Inject] Mock<IUserRepository> mockRepository; // ⑥

    [SetUp]
    public void CommonInstall()
    {
        Container.Bind<HomeUseCase>().AsSingle(); // ②

        var mockRepository
            = new Mock<IUserRepository>(); // ③
        var mockDataObservable
            = Observable.Return<UserEntity>(new UserEntity());
        mockRepository.Setup(x => x.Get()).Returns(mockDataObservable);

        Container.BindInstance(mockRepository.Object); // ④
        Container.BindInstance(mockRepository).AsSingle();  // ⑤

        Container.Inject(this); // ⑥
    }

    [Test]
    public void CallRepositoryAndReturnsHomeViewModel()
    {
        IHomeViewModel viewModel = null;
        useCase.LoadHomeModel()
            .Subscribe(vm => viewModel = vm); // ⑦
        Assert.IsNotNull(viewModel);
        mockRepository.Verify(x => x.Get(), Times.Once()); // ⑧
    }
}
説明箇所ありすぎなので番号を振っています
①ZenjectUnitTestFixtureの継承
テストコードはZenjectUnitTestFixtureクラスを継承します。 これでContainer等の扱いが可能になり(Baseクラスで定義)、Zenjectのテストがしやすくなります。
②CommonInstall内でのContainerへのBind
テストに必要なコンポーネントはContainerへBindしていきます。 まずはテスト対象のHomeUseCaseをバインドしています。 CommonInstallはSetupアトリビュートによりテストの前に実行されます。
③依存コンポーネントのMock生成
通常のZenjectのContainerと同様、依存するコンポーネントはContainerの中にBindしておく必要があります。 テスト対象のHomeUseCaseはIUserRepositoryに依存しているためにどうにか用意しBindします。
しかしUserRepository自体をBindすると以下の問題がでます。
- UserRepositoryが依存しているクラスもBindする必要がある
- HomeUseCaseのテストなのにUserRepositoryの状態に深く影響される
ということで、ここでMockを利用しています。 Mockを利用するためには対象のクラスにインターフェース定義が必要です。
ここではIUserRepositoryが定義されており、 HomeUseCaseでもすべてインターフェースで取り回ししているため、Mockでのテストが可能になります。
Moqの詳しい利用法は省略しますが、新しいMockオブジェクトを生成し、 Get()メソッドをスタブし、「即時UserEntityを返却するObservable」を返却するようにしています。
④MockUserRepositoryのBind
MockオブジェクトのObjectプロパティをBindすることで、Mockオブジェクトのインターフェースをbindできます
⑤Mockオブジェクト自体のBind
今回は振る舞いに関してもテストしたかったので(あとで解説)モックオブジェクト自体もBindしています
⑥テストクラス自体のBind、テスト対象のInject
最後にテストクラス自体もBindしてます。 これはちょっとしたテストコードで楽をするための工夫で、 こうすることにより、 冒頭に宣言したInjectアトリビュートのプロパティにContainer内のテスト対象のクラスがInejctされ、そのまま利用できるようになります。
⑦実際のテスト
LoadHomeModelメソッドを実際にコールし取得したObservableを稼働させることでテストを実行します。 ③で本来は非同期のObsevableを即時値を返すように設定しているので、 Subscribeをコールした直後、OnNextのストリームが流れSubscribe内のラムダに処理が移ります。 ここでIHomeViewModelがちゃんと返却されるかどうかをテストしています。
⑧UseCaseの振る舞いのテスト
一応、UseCase内でちゃんとUserRepositoryを利用しているかをチェックしています。 やろうと思えばUserRepositoryを経由せず、内部でクラスをインスタンス化しても⑦のテストは通すことはできるので。
⑧ではmockRepositoryのGetメソッドが1回呼ばれているかどうかをチェックしています。
まとめ
Zenejctとかを使う場合で依存が発生する場合のテストの例を挙げました
- ZenjectUnitTestFixtureを使うとContainerを利用したUnit Testができる
- MockフレームワークとInterfaceを利用することで対象のテストにフォーカスできる
正直UniRxの非同期の部分をこのようにテストすべきかどうかはちょっと不明です。 そのほかPlayModeTestを利用する方法もありますが、オーバーヘッドが大きいような?
それとMoqを利用しましたが、 MockライブラリとしてはNSubstitute(http://nsubstitute.github.io/)のほうが扱いやすい感じ。 ただMoqの方はZenjectにバンドルされており、単純なMockであればもっと簡単にかけたりします。
Zenject BindのAsSingle, AsCached, AsTransientの違い
Zenjectを使い始めて、最初の方に?ってなるのがAsSingle(), AsCached(), AsTransient()な気がします。 正直ZenjectのREADMEを何度読んでもイマイチよくわからない。 いろいろ挙動を調べたので解説します。
Scopeとは
AsSingle(), AsCached(), AsTransient()はZenjectでScopeと呼ばれるものです。 READMEによると「生成されたインスタンスが再利用される頻度」みたいなことが書いてあります。 日本語もしくは英語でOKな説明ですが、Scopeは対象のインスタンスがDIコンテナにて要求されたときに、 新しく生成するのか、同じものを使いまわしてInjectするのかを指定するメソッドになります。
ひとまず、Scopeの指定を何もせずに何かをBindしてみると...
public class SceneInstaller : MonoInstaller<SceneInstaller>
{
    public override void InstallBindings()
    {
        Container.Bind<Sample>();
    }
}
エラーになります。
ZenjectException: Assert hit! Scope must be set for the previous binding! Please either specify AsTransient, AsCached, or AsSingle. Last binding: Contract: Sample, Identifier: NULL
READMEではDefault: AsTransientみたいなことが書いてありますが、 何かしら指定しないといけないようです。
使い方は以下みたいなかんじです。
public class SceneInstaller : MonoInstaller<SceneInstaller>
{
    public override void InstallBindings()
    {
        Container.Bind<Sample>().AsSingle();
    }
}
シンプルな場合のAsSingle, AsCached, AsTransientの違い
まず、前置きとして、 同じコンテナに同じタイプのインスタンスは、そのままでは複数個バインドできません。 これはScopeをつけても同じです。
つまり、以下はいずれもエラーになります。
public class SceneInstaller : MonoInstaller<SceneInstaller>
{
    public override void InstallBindings()
    {
        Container.Bind<Sample>().AsSingle();
        Container.Bind<Sample>().AsSingle(); // エラー
    }
}

public class SceneInstaller : MonoInstaller<SceneInstaller>
{
    public override void InstallBindings()
    {
        Container.Bind<Sample>().AsTransient();
        Container.Bind<Sample>().AsTransient();  // エラー
    }
}

public class SceneInstaller : MonoInstaller<SceneInstaller>
{
    public override void InstallBindings()
    {
        Container.Bind<Sample>().AsCached();
        Container.Bind<Sample>().AsCached();  // エラー
    }
}
それを踏まえて三者の違いを比較します。
AsSingle
AsSingleはコンテナ内でインスタンスが1つであることを保証するように動作します。 複数のオブジェクトからInjectの要求があったときに、必ず同じインスタンスが注入されます。

AsCached
AsCachedはもし利用できるインスタンスがコンテナ内に存在すれば、 そのインスタンスをInject時に利用します。 ぶっちゃけ、このシンプルな例ではAsSingleとほぼ等価です。

AsTransient
AsTransientはインスタンスの再利用をまったく行いません。 Injectの要求があるたびに、コンストラクションのフローが走り、 それぞれのクラスに、別々のインスタンスが注入されます。

AsSingleとAsCachedのちがい
正直、AsSingleとAsTransientはわかりやすいです。 AsSingleはSingletonのように1つしか存在しない、AsTransientは毎回別物が生成されるといった覚え方で大丈夫そう。
ではAsCachedとAsSingleのちがいは...?
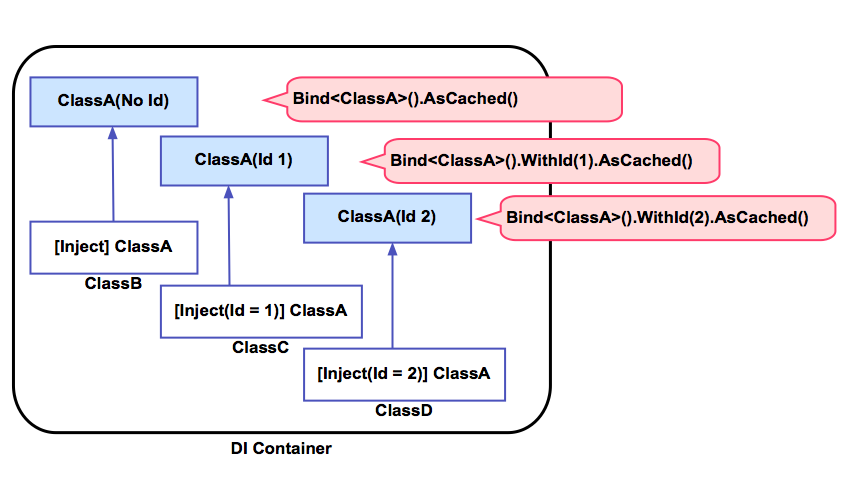
実はいくつかのケースで違いがあります。 その一つがIdを指定するケースです。 Zenjectでは以下のようにWithIdメソッドでBindするインスタンスにIdをつけ、Inject時にそのIdを指定できます。
using UnityEngine;
using Zenject;

public class SceneInstaller : MonoInstaller<SceneInstaller>
{
    public override void InstallBindings()
    {
        Container.Bind<Sample>().AsCached();
        Container.Bind<Sample>().WithId(1).AsCached();
        Container.Bind<Sample>().WithId(2).AsCached();
    }
}

class ClassA
{
    [Inject(Id = 1)] Sample sample;
}
つまり、Idをつけ識別可能な状態であれば、 AsCachedは複数のBindの指定が可能で、別々のインスタンスを生成します。
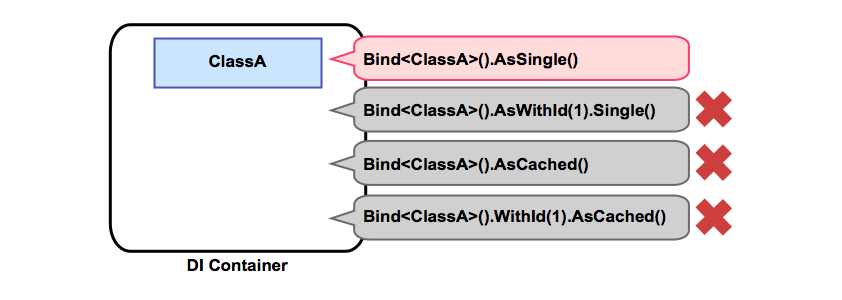
逆にAsSingleはIdをつけようが何をしようがエラーになります。
ちなみにAsTransientでもIdをつけられますが、 インスタンスの再利用はされないため、あんまり意味がないです。 (WithArgumentsを使う場合は意味あるかも)
Sub Container(Context間で親子関係)がある場合
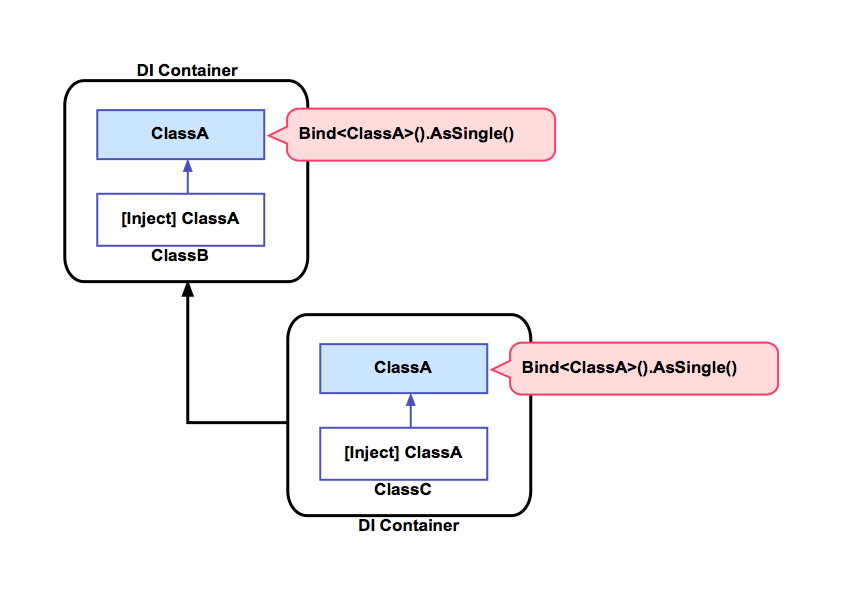
Scopeはコンテナに対しての指定です。 コンテナが異なれば、例え親のコンテナに同じオブジェクトがすでにバインドされていても再度バインドできます。
この場合、インスタンスが要求された際、 同じコンテナ内のインスタンスが優先して解決されます。
また、Idを指定することで親のコンテナの中のインスタンスを指定することもできます。
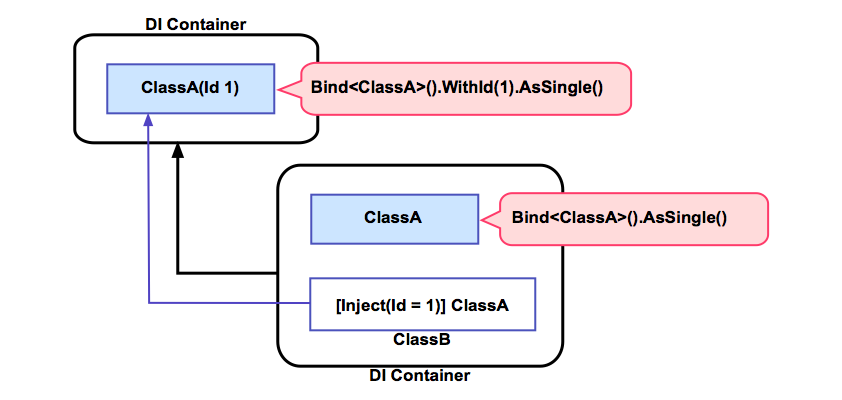
つまりAsSingleを指定した場合であったとしても、 コンテナごとに複数の同じクラスのインスタンスが生成されるということになります。 ここがSingletonとは違うところですね。
ちなみに親と子でIdが重複したときの挙動ですが、 Bindは可能で自身のコンテナ内のインスタンスを優先している感じです。
InterfaceをBindする場合
InterfaceをBindする場合、実は以下のような記法もエラーになりません。
public class SceneInstaller : MonoInstaller<SceneInstaller>
{
    public override void InstallBindings()
    {
        Container.Bind<Sample>().AsCached();
        Container.Bind<ISample>().To<Sample>().AsCached();
    }
}
その場合、SampleをInjectした方と、ISampleをInjectした方で、違うインスタンスが解決されます。 (おそらくBindInterfacesAndSelfToを使ったほうが予期した動作になりそう)
ちなみにAsSingleを利用したときの以下はエラーになります。(前のバージョンではできた?)
public class SceneInstaller : MonoInstaller<SceneInstaller>
{
    public override void InstallBindings()
    {
        Container.Bind<Sample>().AsSingle();
        Container.Bind<ISample>().To<Sample>().AsSingle();
    }
}
Unbindした場合
Zenject的にはUnbindはあんまりよくない使い方らしいですが、以下のような挙動になります。
- 同じクラスのAsSingleによるUnbind、再Bindはエラーになる。
public class SceneInstaller : MonoInstaller<SceneInstaller>
{
    public override void InstallBindings()
    {
        Container.Bind<Sample>().AsSingle();
        Container.Unbind<Sample>();
        Container.Bind<Sample>().AsSingle();
    }
}
- 同じクラスのAsCachedによるUnbind、再Bindはできる。
public class SceneInstaller : MonoInstaller<SceneInstaller>
{
    public override void InstallBindings()
    {
        Container.Bind<Sample>().AsCached();
        Container.Unbind<Sample>();
        Container.Bind<Sample>().AsCached();
    }
}
- AsCachedをAsSingleで再Bindするとエラーになる
public class SceneInstaller : MonoInstaller<SceneInstaller>
{
    public override void InstallBindings()
    {
        Container.Bind<Sample>().AsCached();
        Container.Unbind<Sample>();
        Container.Bind<Sample>().AsSingle();
    }
}
まとめ
ZenejctのScopeについて解説しました。
- AsSingleはコンテナ内でなんだかんだ1つのインスタンスになる
- AsTransientは要求されるたびに毎回インスタンシングフローが走る
- AsCachedはできる限りインスタンスを使いましてWithIdとかを利用すると識別とかができる
- AsSingleでもContainerの親子関係を作って複数インスタンスを使いわけることもできる
ただ、Idを使いまくったり、Unbindを使いまくったたり、Interfaceを変な風に使いまくると 多分わけわかんなくなるのでやめたほうが良さげなきがします。
CryptoKittiesでにゃんこ飼ってみた
仮想通貨とかブロックチェーンとか、 大分前から盛り上がってますよね。
どんなことができるのか、 技術的な特徴みたいなところに興味あってちょっとずつ勉強してる次第です。
その中でもブロックチェーンをゲームっぽいものに応用した CryptoKittiesというサービスを前々から耳にしており、 気になっていたのでやってみました。
ただ、仮想通貨も一切保持したりしてなかったので全部最初からです。
というかモチベーションは「猫飼いたい」の一言につきます。 なので、ビットコインとか仮想通貨で儲けたいとか一切ないです。 最短で猫の所持に向かいます。
CryptoKitties
CryptoKittiesは分散アプリケーションのプラットフォームであるEthereum上にて、仮想の猫を売買したり、育てたりするブロックチェーン技術を応用したゲームです。
CryptoKitties | Collect and breed digital cats!
各猫には遺伝子のようなものが設定されており、 それによって見た目が一匹一匹異なります。
猫の絵柄自体は画面のキャプチャとかとればコピーできますが、 その猫の所有権はブロックチェーンの分散台帳技術により明確に決まっているのです。
つまり、猫を単純に愛でる以外にも、 超レアなこの猫は俺の猫!っていう所有欲的な何かを満たして楽しむこともできます。
そして猫の売買もできるので、 過去には1300万円みないな超絶金額で取引された事例もあるそうです。
おおまかな流れ
- ウォレット(MetaMask)の登録
- CryptoKittiesに登録
- 仮想通貨取引の口座開設
- 仮想通貨、Ethereum (ETH)の購入
- ウォレットに送金
- 猫の選定・購入
1. MetaMask
まずウォレットとしてMetaMaskを導入します。 ウォレットは仮想通貨を保管するためのアプリケーションです。
いろいろなタイプやアプリケーションがあるようですが、 CryptoKittiesはMetaMaskというアプリが必要です。

なんかキツネ?でかわいい。
導入方法は検索するとたくさん出てきますが、 以下を参考にさせていただきました。
イーサリアムの便利ウォレットMetamask(メタマスク)の使い方について | ARUTOKO(あるとこ)
2. CryptoKittiesに登録
とりあえず、公式サイトから登録をします。
このとき、ページ下部に出るCookieの許可と、 Chrome ExtensionのMetaMaskにログインしておかないと、うまく進めません。

最近、日本語に対応した模様。
準備ができたら「始めるにゃ!」をクリックします。
登録フローは一般的なWebサイトと同様な感じです。
3. GMOコイン口座開設
CryptoKittiesはEthereumプラットフォーム上のアプリケーションであるため、通貨として仮想通貨Ethereumが必要です。
自分はこの時点で、 仮想通貨を持っていなかったので取引所の口座を開設し取得を行っています。
仮想通貨取引所は多数ありますが、自分はWebで適当に検索し、適当にGMOコインを選択しました。
以下、大まかなフローです。
- アカウント登録
- 免許証・通知カードアップロード
- 審査待ち
- 郵送された口座開設コード入力
アカウント作成後、審査に4日ほど、 そして、郵送送られてくる開設コードを入力する必要があります。

4. 仮想通貨、Ethereum (ETH)の購入
口座の開設が完了したら、Ethereumの取得を行います。
まずは取引所の口座に、日本円を入金します。 いくつかのネット銀行であればWebのフローから即時入金が可能です。
つぎに実際にETHを購入します。
ひとまず、0.03ETHほど買ってみます。

購入時のレートでは大体1600円くらいでした。
5. ウォレットに送金
取引所の口座にて、 ETHの取得ができた後はMetaMaskに送金します。
まずMetaMaskのAdressをコピーします。

そのアドレスを取引所の口座の送金先に指定し送付を実行。

しばらくするとMetaMaskのウォレットに反映されます。
さらに取引履歴からトランザクションがちゃんと処理されていることも確認でき、ブロックチェーンしてる感が味わえます。
6. 猫購入
さて、これで事前準備完了です。
再度CryptoKittiesのサイトに行き、猫を品定めします。 カタログメニューではなく検索メニューからセール用にチェックを入れて探すと、 安めのにゃんこが手に入りそうです。

購入するにゃんこを選んだら購入ボタンから購入を進めます。 その際、MetaMaskの確認画面が開き、取引ETH額と手数料が表示されます。この手数料がマイニング等で得る通貨になるのですね。中央サーバーの代わりに処理をしくれている端末に思いを馳せて、Submitを押します。

そして初めて、購入したにゃんこがこちら。

名前をカフェオレとつけました。 な、なんだ、かわいいじゃねーか、、、
まとめ
今回は、単純に猫が飼いたかったため、CryptoKittiesでにゃんこを購入してみました。
購入しただけで、他のフィーチャーは試せていませんが、 にゃんこ同士を交配させて、見た目を引き継ぐ子孫をつくったりもできます。
他にもCryptoKittiesのにゃんこを使ったサードパーティ制のアプリや、それを支援するプラットフォームKittyVerseなるものが発表されているらしいです。
にゃんこへの投機的な側面は薄れつつあるのかもしれませんが、どんな展開になるのか楽しみです。
また、仮想通貨を初めて触ったこともあり、いろいろ体験できてよかったです。理論や内部実装の勉強もしていますが、実際にサービスに登録し、リアルタイムに通貨送金のトランザクションを発行することで、システムが動作することの感動を感じられました。
参考
ZenjectのGameObjectContextの使い方
ZenjectにおいてSceneContextはとっつきやすいですが、 長い間GameObjectContextってどう使っていいかイマイチだったりしてました。 日本語の解説も少ないですし。
今回はそんなGameObjectContextの使い方を調べたので紹介します。
GameObjectContextの基本とSceneContextとの親子関係、サブコンテナ
GameObjectContextはシーンに配置しておくとで、 そのシーンのSceneContextを親とする、サブのContextとコンテナを作ることができます。
以下のようなSceneInstaller.csとGameObjectInstaller.cs、 ログ出力をするだけのGreeterクラスと、そのクラスを利用するGameObjectSampleクラスを実装してみます。
using UnityEngine;
using Zenject;

public class Greeter
{
    public void Greet()
    {
        Debug.Log("Hello");
    }
}

public class SceneInstaller : MonoInstaller<SceneInstaller>
{
    public override void InstallBindings()
    {
        Container.Bind<Greeter>().AsSingle();
    }
}
using UnityEngine;
using Zenject;

public class GameObjectSample : IInitializable
{
    [Inject] Greeter greeter;

    public void Initialize()
    {
        greeter.Greet();
    }
}

public class GameObjectInstaller : MonoInstaller<GameObjectInstaller>
{
    public override void InstallBindings()
    {
        Container.BindInterfacesTo<GameObjectSample>().AsSingle();
    }
}
ちなみにGameObjectSampleにはIInitializableインターフェースを付与し、 Installer側でBindInterfacesToでバインドしています。 これによりContextのResolve後にInitialize関数がコールされることになります。
実装したら、シーン上のContextを設定します。 Scene ContextにはSceneInstaller.csをアタッチし、Installersプロパティに追加します(こちらは説明割愛)。
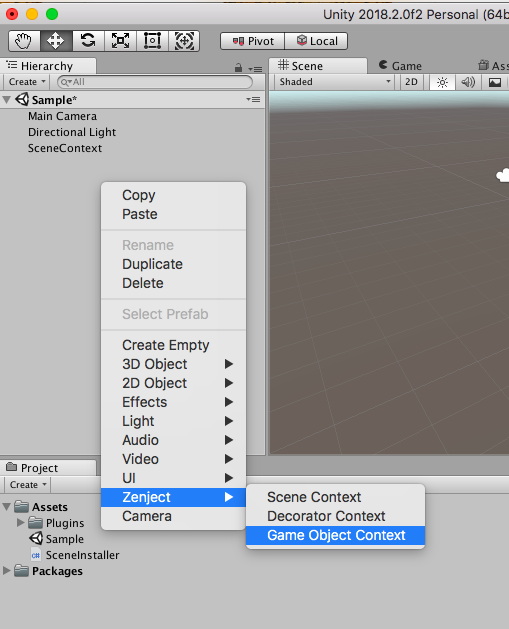
GameObjectContextはScene Contextと同様ですが、 以下のようにCreate Menu -> Zenject -> Game Object Contextから生成できるため、 シーン上に配置し同じようにGameObjectInstaller.csをアタッチ、こちらもInstallerプロパティに追加します。
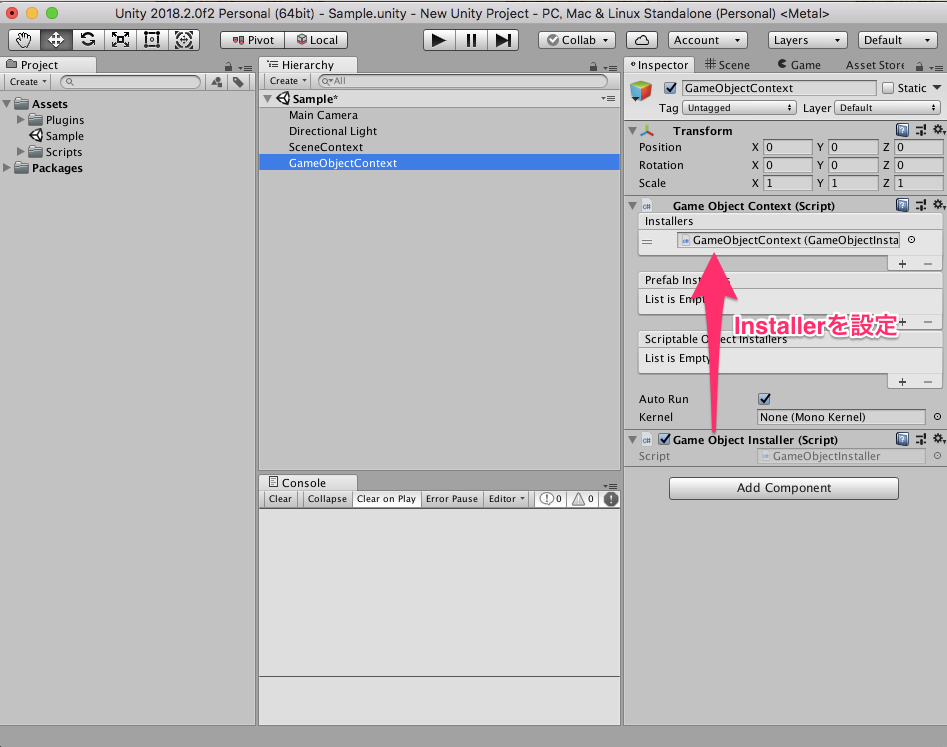
これで設定が完了です。 シーンを再生すると、Context間の親子関係が設定され SceneContextにバインドされたGreeterクラスのインスタンスが、 GameObjectContext内にあるGameObjectSampleクラス内にInjectされ、 Initialize関数内のgreeter.Greet()を無事コールすることができました。
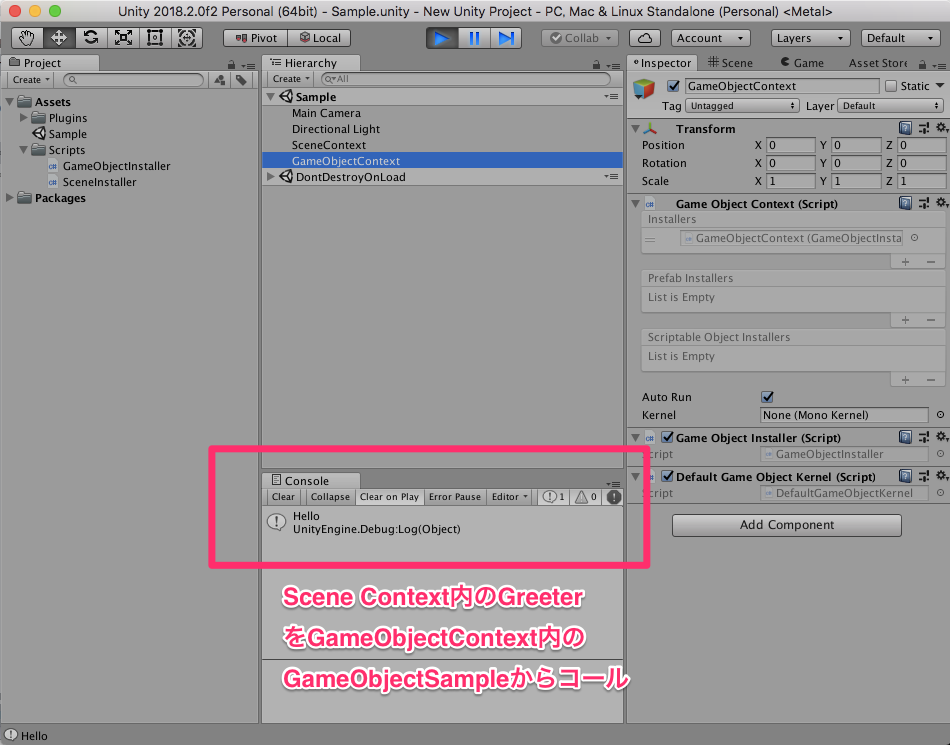
これが、GameObjectContextの基本です。 今回はGameObjectInstaller内では1つのクラスしかBindしていませんが、 SceneContextと同様に複数の要素をバインドしInjectし合うことができます。
また、親子関係のルールはSceneContextのParentingと同じで、 子供Contextは親のコンテナの中の要素を使ってBindできますが、 親が子供のコンテナの中の要素をつかってBindはできません。
このサブコンテナという概念はそれなりに有用です。 一つの大きなSceneContextにすべてをバインドすると、 どこからでもなんでもBindできる結果になり疎結合なのかどうか不明になります。 サブコンテナを使い、局所、局所で必要なものだけをBindできる状態にしておくことでカプセル化を達成することができます。
なお、サブコンテナの作り方にはGameObjectContextを使わない方法(FromSubContainerResolve)もありますが今回は割愛します。
ZenjectBindingコンポーネントによるMonoBehaviourのBind
GameObjectContextでもZenjectBindingコンポーネントを使って MonoBehaviourをシーン上の設定だけでInstallerを使わずにContextにバインドできます。
たとえば、なんでもいいのでMonoBehaviourのSubObjectというコンポーネントを作り、GameObjectSampleクラス内で利用したい場合を考えます。 つまり、以下のようにGameObjectSample内に[Inject] SubObjectと記述する感じになります。
using UnityEngine;
using Zenject;

public class GameObjectSample : IInitializable
{
    [Inject] Greeter greeter;
    [Inject] SubObject subject;

    public void Initialize()
    {
        greeter.Greet();
        Debug.Log(subject.name);
    }
}

public class GameObjectInstaller : MonoInstaller<GameObjectInstaller>
{
    public override void InstallBindings()
    {
        Container.BindInterfacesTo<GameObjectSample>().AsSingle();
    }
}
このとき、GameObjectContextをアタッチしてあるGameObjectもしくは、子供のGameObjectにZenjectBindingを配置します。(例として子供のGameObjectを作っています)
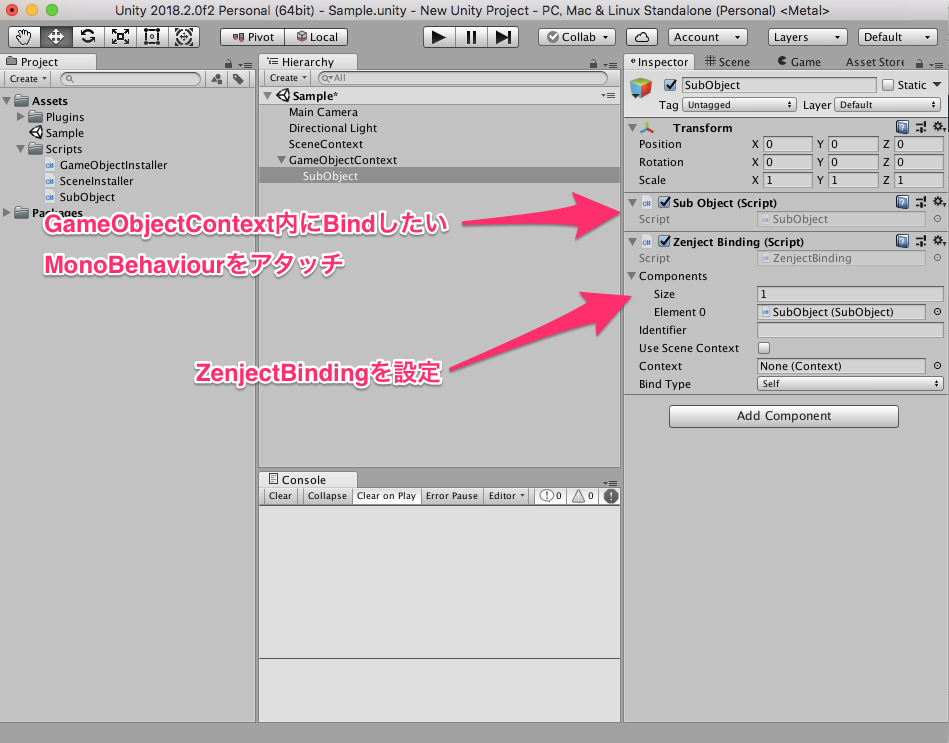
このように、設定を行うとGameObjectContext内でSubObjectインスタンスがきちんと解決されます。(SubObjectインスタンスはGameObjectContext内にBindされるので、SceneContextから見えません)
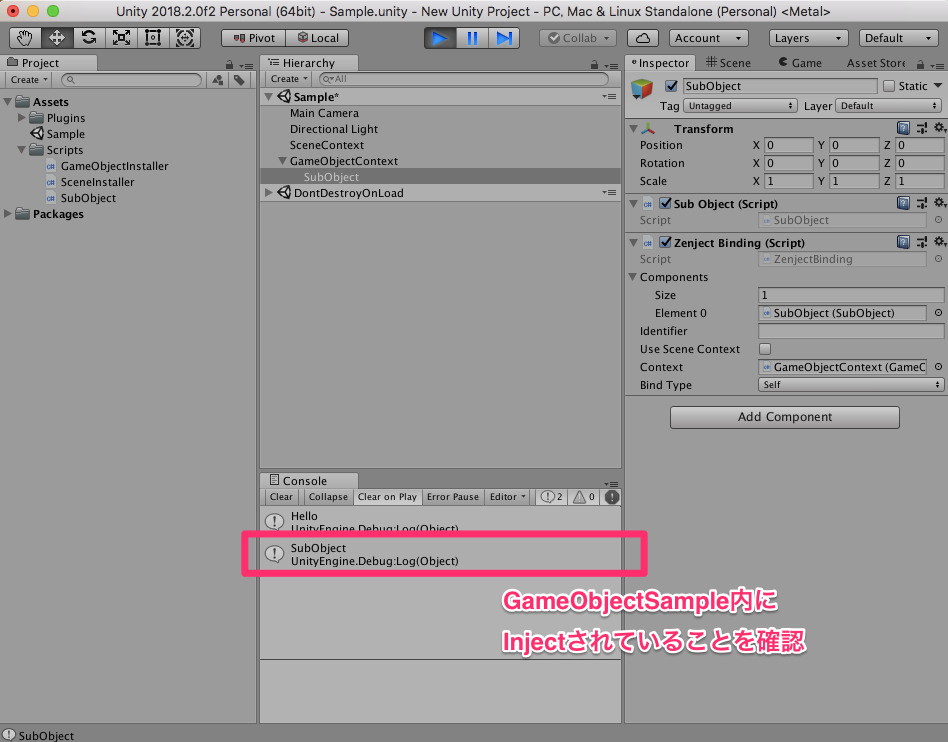
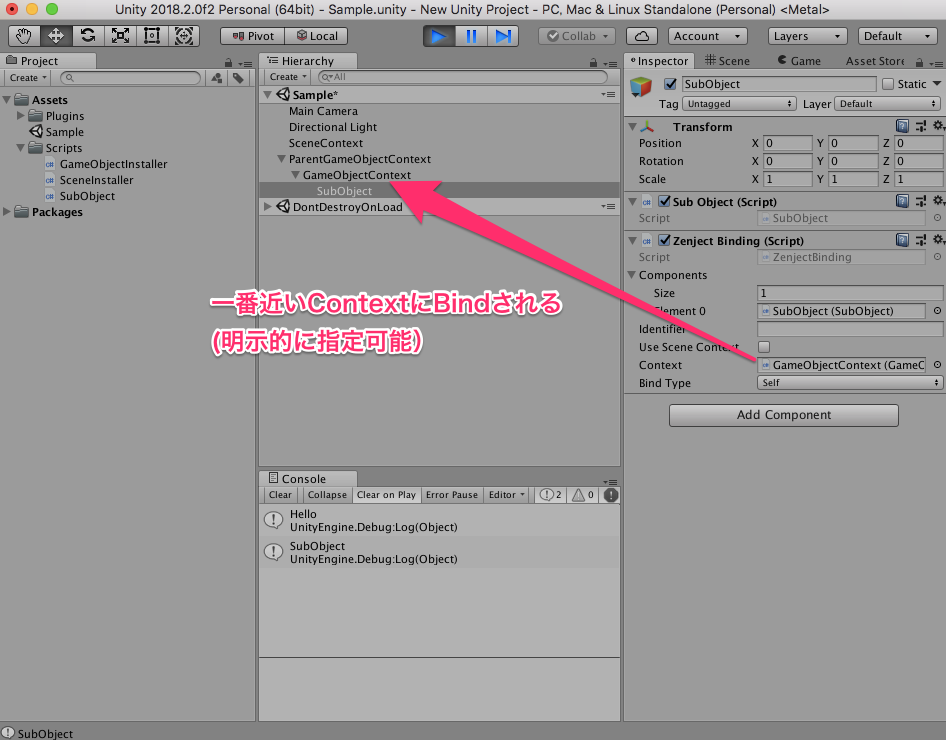
なお、GameObjectContextで親子関係を作ることで階層化させることもでき、 このときZenjectBindingのBinding先のContextは階層で一番近い親のContextになります。
もし、一番近いContext以外にしたい場合はZenjectBindingのContextのプロパティに明示的にContextを指定しておきます。
GameObjectContextの動的生成、そしてFacade
上記の例はGameObjectContextをシーンに事前配置していましたが、 動的に生成することもできます。ただし普通にInstantiateしても動きません。
まずは、第一歩として「シーンの初期化時」に動的にGameObjectContextを生成するようにしてみます。
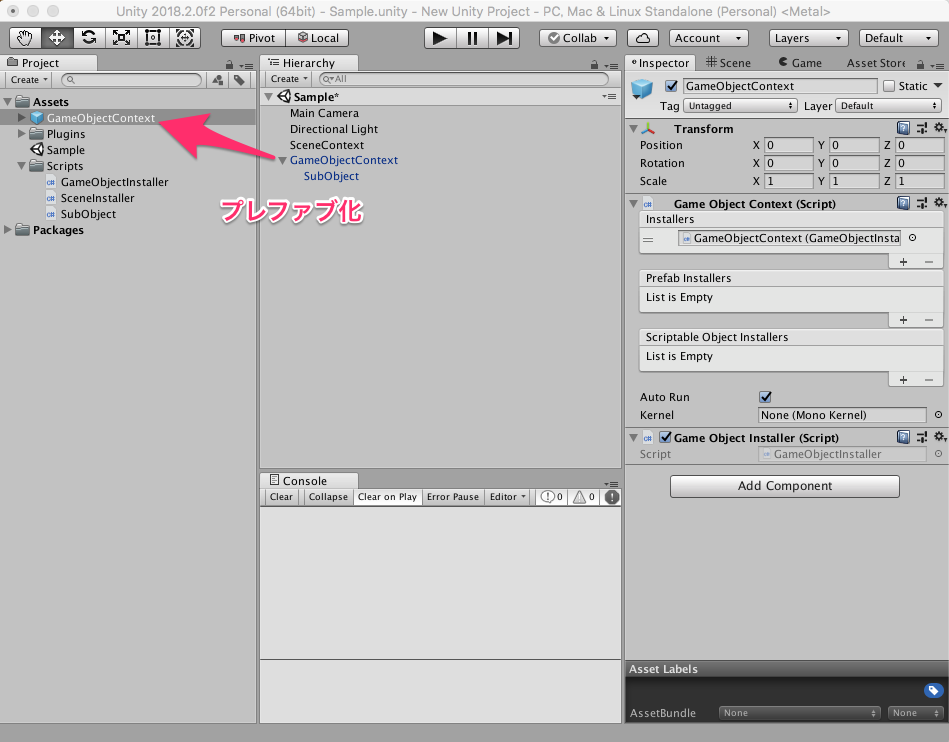
準備としてGameObjectContextをプレファブ化し、シーンから削除します。
そして、SceneInstallerを以下のように修正します。
using UnityEngine;
using Zenject;

public class Greeter
{
    public void Greet()
    {
        Debug.Log("Hello");
    }
}

public class SceneInstaller : MonoInstaller<SceneInstaller>
{
    [SerializeField] GameObject gameObjectContextPrefab;

    public override void InstallBindings()
    {
        Container.Bind<Greeter>().AsSingle();
        Container.Bind<GameObjectSample>()
            .FromSubContainerResolve()
            .ByNewContextPrefab(gameObjectContextPrefab)
            .AsSingle()
            .NonLazy();
    }
}
GameObjectSampleをSceneContextにもBindする流れなのですが、 かなり大仰な感じになりますね...
ここでポイントはFromSubContainerResolveです。 これは、 他のコンテナを現在のContextのコンテナのサブコンテナとして追加し、 Bindで指定した要素をサブコンテナの要素から1つだけ選び、現在のContextにBindするという記法です。
さらに、ByNewContextPrefabでGameObjectContextのプレファブを指定し、NonLazy()つけて起動時に生成させるようにしています。
これにより、FromSubContainerResolve内部にて、ByNewContextPrefabで指定したGameObjectContextのコンテナをSceneContextのサブコンテナとして追加し、その中からGameObjectSampleを探しだしSceneContextにBindします。
また、現状態だと、GameObjectContextにはGameObjectSampleのInterfaceしかBindしていないため、自身もBindするようにGameObjectInstallerを変更します。
using UnityEngine;
using Zenject;

public class GameObjectSample : IInitializable
{
    [Inject] Greeter greeter;
    [Inject] SubObject subject;

    public void Initialize()
    {
        greeter.Greet();
        Debug.Log(subject.name);
    }
}

public class GameObjectInstaller : MonoInstaller<GameObjectInstaller>
{
    public override void InstallBindings()
    {
        Container.BindInterfacesAndSelfTo<GameObjectSample>().AsSingle();
    }
}
バインドの指定をBindInterfacesAndSelfToに変更しました。 これでGameObjectContext内でGameObjectSampleとIInitializableの両方をResolveすることが可能になりました。
ちょっとここまで意味不明だったかもしれませんが、 SceneContextのgameObjectContextプロパティに先程プレファブ化したGameObjectContextプレファブを指定し、シーンを再生してみます。
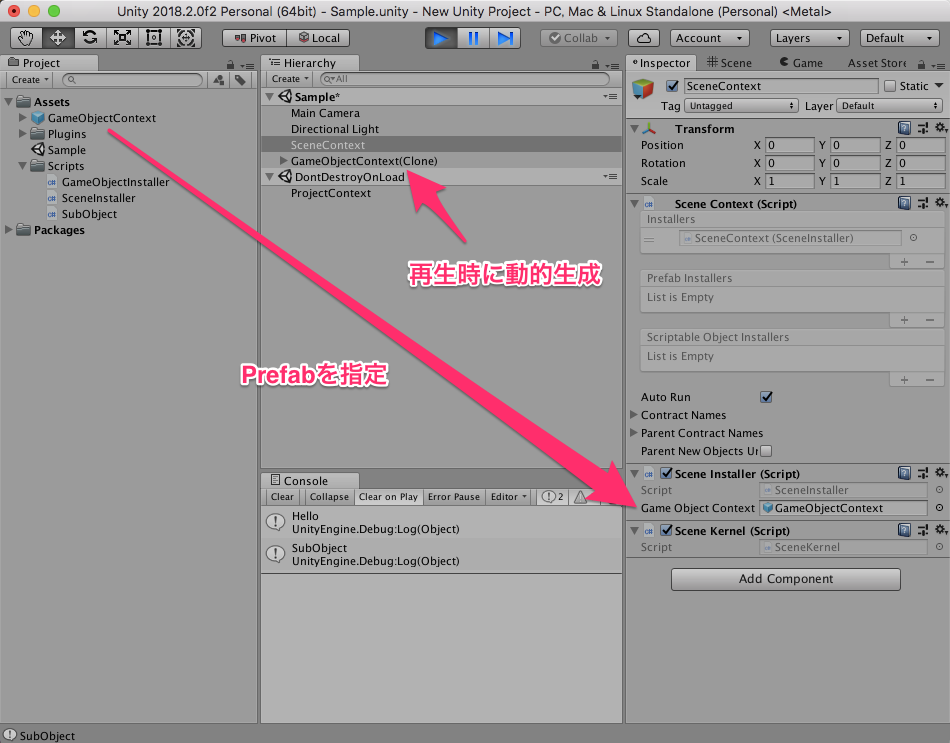
シーン開始時にちゃんとGameObjectContextが生成され、 BindやInjectが成功しログが出力されることが確認できます。
さて、ここで現状でGameObjectSampleクラスは GameObjectContextにバインドされているわけですが、 そのContextのFacadeとして、つまりGameObjectContextにBindしたクラスの窓口や代表者として動作していることになります。
今回の例では、GameObjectSampleインスタンスはSceneContextにもBindされることで、SceneContext内の他の要素とお互いにやりとりすることができます。しかし、SceneContext内の他の要素はGameObjectContext内の他の要素をInjectしたり等、直接アクセスすることはできません。つまりGameObjectContextの世界とやり取りしたい場合は、その代表者と定めたGameObjectSampleクラスを介在する必要があります。
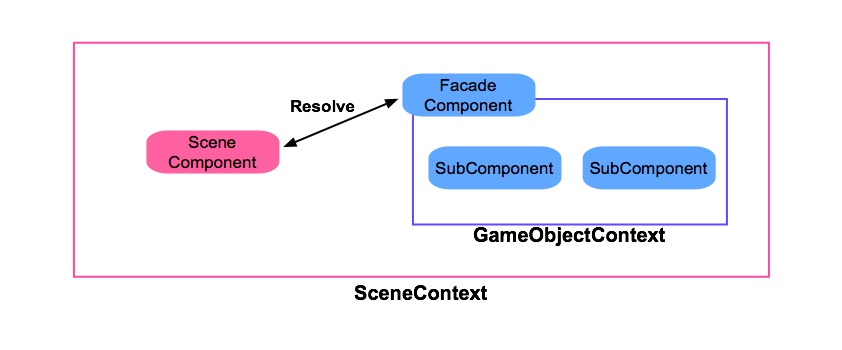
FromSubContainerResolveを利用することにより、SceneContextから見るとBindするものは、GameObjectContextなのか単体のコンポーネントなのかは気にせずに柔軟が使い方ができます。
たとえば、Bindしているクラスが予想以上に肥大化してしまった場合に、 GameObjectContextを使ことでDIによる可用性を保ちながら、サブコンポーネントに分割することや、GameObjectContextとして運用しているものを単純なコンポーネントに置き換える場合等でも大きな変更がいりません。
FactoryによるGameObjectContextの動的生成
さらにFactoryを利用することでGameObjectContextを任意タイミングで生成することができます。
以下のようにGameObjectSampleのFactoryをBindする形式に変更し、 GameObjectContextCreaterというFactoryをクリックで利用する適当なクラスを作ります。
using UnityEngine;
using Zenject;

public class Greeter
{
    public void Greet()
    {
        Debug.Log("Hello");
    }
}

public class GameObjectContextCreater : ITickable
{
    [Inject] PlaceholderFactory<GameObjectSample> factory;

    public void Tick()
    {
        if(Input.GetButtonDown("Fire1")) factory.Create();
    }
}

public class SceneInstaller : MonoInstaller<SceneInstaller>
{
    [SerializeField] GameObject gameObjectContextPrefab;

    public override void InstallBindings()
    {
        Container.Bind<Greeter>().AsSingle();

        Container.BindFactory<GameObjectSample, PlaceholderFactory<GameObjectSample>>()
            .FromSubContainerResolve()
            .ByNewContextPrefab(gameObjectContextPrefab);

        Container.BindInterfacesTo<GameObjectContextCreater>().AsSingle();
    }
}
GameObjectSampleのFactory利用は直接クラスをBind指定するのではなくContainer.BindFactoryでFactoryのBindを行えばOKです。(最近のZenjectではPlaceholderFactoryとして汎用的なFactoryを利用できます)
このときGameObjectContextCreaterはITickableをつけることでm毎フレームTick関数をZenject側からコールしてもらい、Inputクラスにより入力を検知するようにしています。(サンプルな懐かしい書き方)
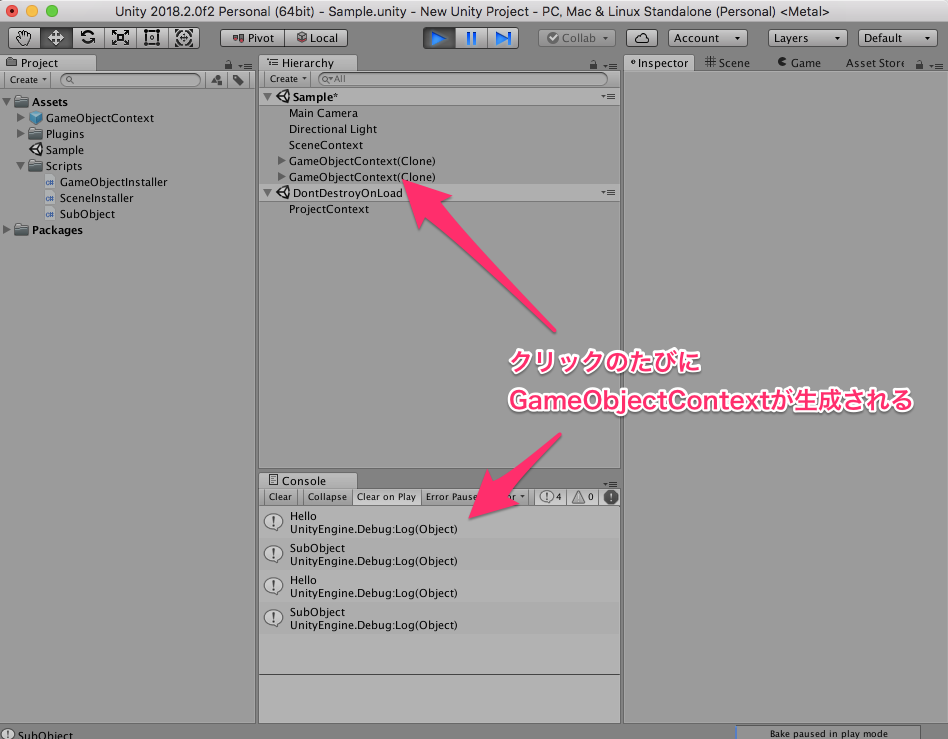
これで、クッリクするたびにGameObjectContextが生成されます。
まとめ
GameObjectContextの使い方を紹介しました。
- GameObjectContextはSceneContextの子となりサブコンテナを形成できる
- ZenjectBindingは一番近いContextにBindしにいく
- FromSubContainerResolveを使うと親のContextにFacadeとしてGameObjextContextのコンポーネントをBindできる
- Factoryを使うことでGameObjectContextを動的に生成することができる
GameObjectContextはSceneContextと違い、より手軽にContextを生み出すことや、破棄することができます。また親子関係の管理も楽です(Sceneが破棄されると同時に破棄される)。取り回しがしやすいのでぜひ使って行きたいです。おそらくこの後はどれをSceneContextとし、どれをGameObjectContextにするのかという議論も必要そうですが。
ZenjectDefaultSceneContractConfigで依存するSceneContextを確認用に自動ロード
UnityのZenjectの他の機能の紹介をしようかと思ったところ、 ZenjectDefaultSceneContractConfigという機能を発見。
おそらくv6.1.0くらいから追加されたっぽいんですが、 個人的には全俺が湧く感じの機能、圧倒的僥倖だったのでこちらを紹介します。
Project Contextの使いにくさ
まず、Zenjectを使う上で、ProjectContextというものがあります。 これは、何かしらのScene Contextが読み込まれる前に、 必ず自動的にロードされるContextで、 アプリケーション起動中に常に必要なものをBindしておくには非常に便利なものです。
ただし、このProjectContextには「どんなシチュエーションでも有無を言わずロードされるため、コンテキストの差し替えが効かない」 という積極的に使用できない欠点がありました。 例えば、タイトル画面がら起動する通常フローはサーバーへ通信を行うコンポーネント群を利用するが、 Editor上での特定テストフローの場合は、 ローカルのフィクスチャファイルからデータをロードするモックコンポーネント を利用する場合等が挙げられます。 これらのような、場合によってはInstallerを差し替えたいというケースの場合は ProjectContextではやりにくかったのです。(内部で処理を分岐させれば可能)
ということで、せっかく自動で前提条件をロードしてくれるContextがあるんですが、 切り替えが生じるContextはSceneContextで実装し、 Scene ContextのAuto Runを切った上で、 自前で依存するSceneContextをロードするフローなどを作ったりしてました。
ZenjectDefaultSceneContractConfigによる自動Contextロード
たとえば、以下のようなSampleシーンのContextが DefaultシーンのDefaultというContract NameのContextに依存しているとします。 こういったシチュエーションの場合、 このシーンの起動にはDefaultシーンを予めロードしておく必要があります。

ゲーム起動の通常フローならば、 おそらくDefaultシーンを誰かがロードするようになっていると思いますが(Build Settings / LoadLevel 0でも)、 EditorでSampleシーンを編集後、動作を確認したい場合、Playボタンを押して、このシーンから直接始めたくなります。 つまり、依存するContextは自動でロードしてほしい。
これが、 ZenjectDefaultSceneContractConfigという機能を使うとできます。
使い方はシンプルで、 まずは、Resources以下にZenjectメニューからZenjectDefaultSceneContractConfigアセット作ります。

そして、デフォルトロード対象のContractNameとシーンファイルを設定します。
これで完了です。 Unity上でPlayボタンを押すと、自動的にDefaultシーンがロードされ再生が始まります。 (停止時に自動ロードされたシーンはアンロードされません)

また、このZenjectDefaultSceneContractConfigには、複数のDeafult Contextが登録でき、 依存関係の解決を再帰的にできるようです。 例えば、あるScene ContextにはAというContextを持つシーンが必要で、 A ContextはBというContextを持つシーンが必要な場合 A, B両方ともZenjectDefaultSceneContractConfigに設定しておけば、 双方自動でロードをしてくれます。
テスト用のContextとのスイッチ?
さらに、ZenjectDefaultSceneContractConfigで設定したContextは、 Scene ContextにおいてParent Contract Nameが設定されている状態かつ、 まだシーンにロードされていないときのみ、ロードの処理が走ります。
つまり、予めDefaultシーンのContextと同じContract Nameを設定した別のContext、 例えばテスト用のDefaultシーンを用意しPlay前にロードしておけば、 コードを一切変える必要なく、動作の切り替えができそうです。

ちなみにこのZenjectDefaultSceneContractConfigはEditorのみの機能のようで、 通常のビルドでは明示的に依存シーンをロードするフローが必要です。 そのため、今回のように、あるシーンが他のシーンに依存するが、 確認フローやテスト等で直接起動したい場合のワークフローに有効そうです。
むしろEditorのみの機能だとしたら、 DefaultSceneContractConfigの方をモックやスタブしたContextにしておいたほうが良いのかもしれませんが。
ZenjectのScene Decorator Contextの使い方
最近、UnityのプロジェクトではZenjectを使っており、 1年くらい実プロジェクトで運用してようやくコツがわかってきた気がする。
しかしながら、 Scene Decorator Contextがどんなものかをあまり理解しておらず調査したのでメモ。
そもそもZenejectのContextと親子関係
ZenjectのContextには以下の4つのタイプがある
- Project Context
- Scene Context
- Scene Decorator Context
- GameObject Context
この中でProjectContextはゲーム起動時に必ず生成される。 そして全てのContextの親である。 そのためどんな環境でも利用すべき神的な何をBindするには良い。 ただし、テストのことも考慮するとテスト環境でも利用するマジでゴッドなものに限る。
そしてScene Contextはシーンをロードすることで、子となる新しいContextを生み出すことができる。 GameObject ContextもScene Contextの子になることができるし、Factoryを使うことで動的に子となるContextを生み出すことができる。
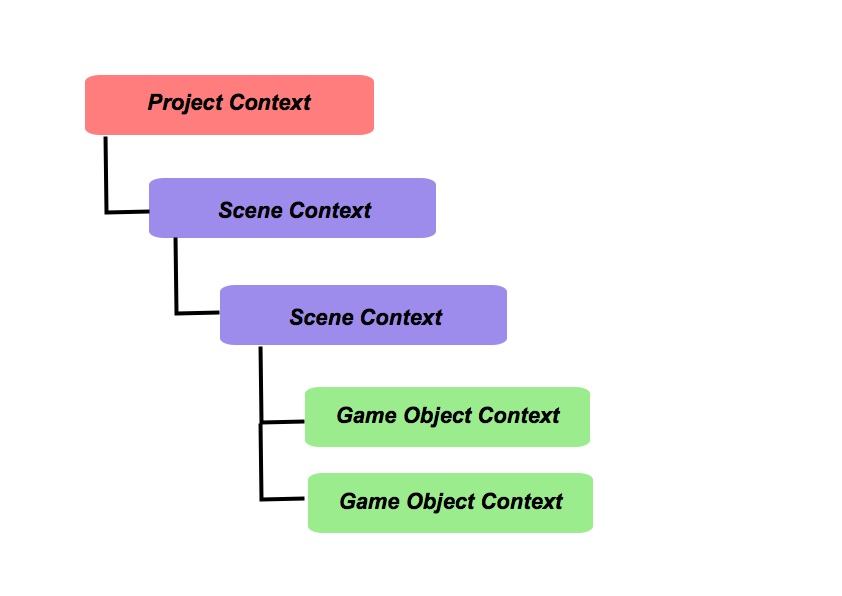
こんなカンジでContextの親と子を設定したり、 ある意味のある塊や粒度ごとにContextを切り分けることで、 カプセル化やContextの差し替え、動的な生成・破棄などが可能になってくる。
ただし、親子関係が存在すると言うことは、 Context間に依存関係が生じるということで慎重に用いる必要がある。
Scene Decorator Context
Scene Decorator Contextは親子関係を作らずにContextの分離と差し替えを可能にする仕組みだ。 もしくは、Decoratorパターンのように、対象Contextに何の変更もなく機能を付与する仕組みと言える。
たとえばある1つのゲームが起動している状態を3つのScene Contextに分ける場合を考える。
- Stage Scene Context
- UI Scene Context
- Main Scene Context
ちなみに、Contextを分割するメリットは、 StageやUIをデバッグ用や別のセットに差し替えたり、個別にテスト等を行えるようにすることが主だと思う。
で、この場合、Main Scene ContextがEntryとなってゲームが駆動する場合、 Scene Contextの親子関係を作るとしたら、いくつかパターンがあるが、例えば以下のようなものが考えられる。
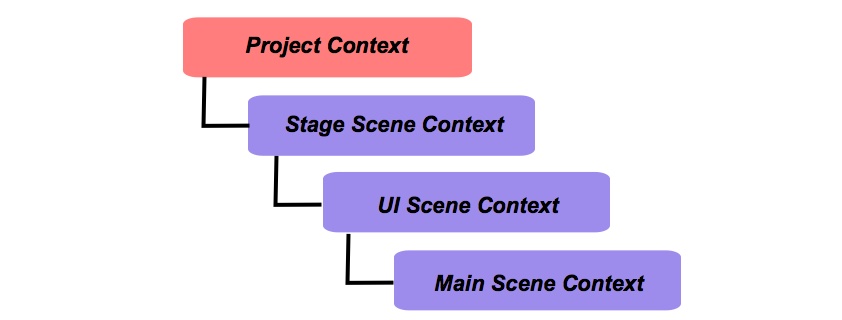
Zenejectは途中のバージョンからParentを2つ以上もつことができるようになったので
もしくはこう
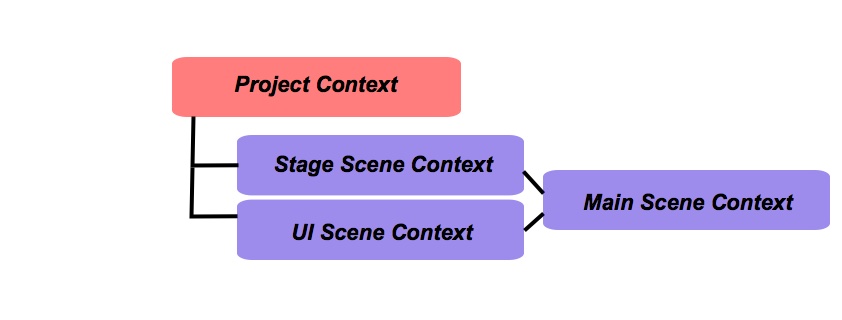
反面、Scene Decorator Contextのイメージは以下のようなカンジだ。
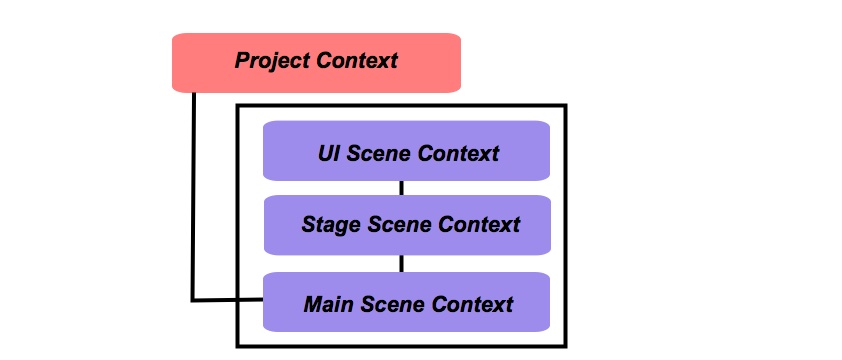
つまり、それぞれのScene Contextが親子というより、なんとなく同列なカンジになる。
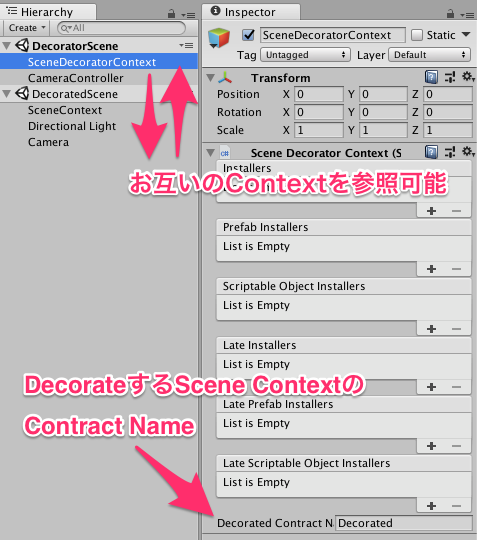
ここで、親子関係を作る方法と比較して、 Decorateする方法の違いを挙げると、 Decorateする方法は相互にContext内のContainerに参照ができる点である。 親子関係を作る方法に置いて、上記の例のパターンではStage SceneやUI SceneからはMain Sceneを参照できないが、 Decorateする方法はStage SceneやUI Scene、Main Scene内のContextをあたかも同一かのように扱うことができる。
なお、実際Editor上の設定方法は以下みたいなInspectorとシーンの状態になる。 注意点としてはシーンをロードする順番(Hierarchyの順番)はDecorator Scene => Decorated Sceneにする必要はある。
Scene Decorator Contextのメリットは?
Scene Decorator Contextのメリットは 対象のContextや親子関係を変更なく、機能の一部の差し替え、もしくは機能の追加ができる点だ。 たとえば、 特定のケースのときだけDecoreted Sceneを読み込んで機能を付与(対象コンテキストを装飾)することができる。
これは、複雑な親子関係の設定を、ある程度シンプルなものにしてくれる。 Scene Parentingな方法だと、親子の関係を慎重に設計し、 階層構造を意識しながらParent Context Contract Nameとシーンのロードをしなければならない。
Scene Decorator Contextを導入することで、 アプリケーション本筋である大枠の文脈(Context)の依存関係をざっくりと意識するだけでよくなる。
どんなときにDecorator Contextが使える?
未検証だが多分以下のようなUseCaseが考えられるおもう
- デバック用のコマンドやUIの機能を特定のScene Contextに付与する
- Parentingとして意識したくないScene Context(大筋外の文脈)の分割
- チュートリアルフローなど?
そのScene Contextは親子?
正直いうと、Scene Decorator Contextの機能は、 親子関係を工夫することである程度まかなえる気がする。
しかしながら、かねがねZenjectをしばらく利用してきたわけだが、 本当に概念上の親子関係なのか疑問に思うパターンもいくつかあった。 例えば、上記の例だとStage ContextとMain Contextってどっちが親なん?というか親子関係なん?といった具合である。
さらに、Scene Contextの親子関係の依存周りがネックになりやすいという印象を持った。 なにせZenjectはContext同士の依存関係を解決してくれるが、 Sceneの依存関係は自動で解決してくれない。 Zenjectのためにシーンのロードのお膳立てをする必要あり、 そのあたりが複雑になると(何重にもScene Parentingを行うと)わけわからんくなる。 さらに言うとHierarchyビューで親子関係の視覚化が行われないので、とっつきにくいのもある。
そもそも、親を複数持てるということも混乱を招きやすいように思う。 親ではなくDependancyみたいな命名だったらもうちょいわかりやすいが。 で、クラス間の依存解決をサポートするためにDI Containerがあるはずなのに、 Context間の依存に苦しむのは本末転倒感がある。
そのため、親子関係の設定は極力シンプルにしておきたい気がする
まとめ
以上、Decorator Scene Contextについての機能と自分の見解でした。 最後ほうDecorator Scene Context推しみたいな主張になってしまいましたが、 時と場合によって使い分けるべきなんでしょうね。
自分の中では、 以外と使いどころはあるのかなと思っているので、導入を検討してみます。